NURBS Modeling Process Tutorial
This is an organic NURBS modeling process that should be useful regardless of the modeling task. The process should be useful to the complete novice but I hope there is some information that is useful to the intermediate and advanced modeler. Once you have grasped NURBS modeling for your software application using step by step tutorials there comes a time when you want to model your own creations. However you still want to learn many of the principles, gems and tips and it seems the only way to obtain these is to look for these gold nuggets by reading many, many tutorials and infer them yourself. This is an attempt to write a tutorial that is based around the modelers own task. This process can be applied to many NURBS modeling tasks. I have tried to make it general to many modeling software application but some may be specific to the authors current choice of software – Maya.
The biggest mistake most beginners make when they start modeling is that they don’t have accurate references. It is very difficult to accurately model a complicated object from memory. If you attend a life drawing or human figure sculpting class the instructor will tell you that you should spend more time looking at the live model than you do your own paper or sculpture. So at the very least you should have references to look at when you model on the computer. If you are drawing your own references remember that its possible to make drawings from the front and side that look good but actually don’t represent the same 3d object. For this reason it can be good to design your character in two or three point perspective and from this drawing draw the two images for the front and side. Otherwise just take note that you might be positioning CVs appropriately in one viewport as per the sketch and then moving them out of place when you align them with the sketch in the other viewport.
Load references into the viewports of your software application. References can be in the form of digital photos, scanned images or they can be painted in a 2d sketching application. An actual 3d object is also a great additional reference when its available. If modeling a hand or foot, examine your own from the same angle as it appears in the viewport while you model - difficult with a foot from some angles :-).
It is possible to create designs in the software by trying various shapes out. This will take a lot longer than designing from a reference and is probably more suited to subdivision surfaces than NURBS. With subdivision surfaces its easier to block out the general shape and make radical adjustments that are very time consuming with NURBS such as adding appendages that require making curves on surfaces and fillet blending, etc with NURBS. Remember though that even if you aren’t basing the design off of any particular reference that references of say human cheeks, lips, eyes and ears are still useful if you are creating a caricature or stylised creature for example. References of say cockpits and landing gear would be useful if you were modelling a space ship. So you should have references regardless of the fact that you are designing in 3d as you go.
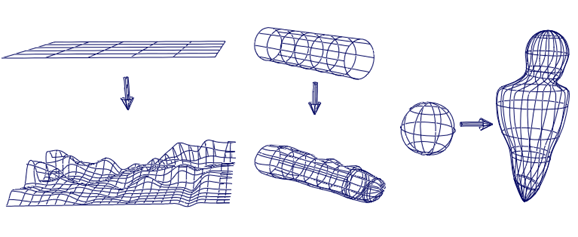
Select a primitive based on the shape expected for the final geometry.

Now it is time to edit the model in hull - lines of CVs - sections. Use the hull selection mode to select a whole row of CVs at a time and move and scale them into place.
If your model has two identical sides ie both sides a mirror image of one another then start modelling the shape to your reference images with a whole primitive rather than half a primitive. Scaling CVs of half a primitive requires that you set the scale pivot point on the mirror axis each time you select a group of CVs that include ones on the mirroring axis. With a whole primitive – one that isn’t cut down the mirroring plane -, when you select hulls and scale, both sides will scale about the mirroring axis leaving the CVs on that axis in place. At this stage it is good to use the hulls selection mode in Mayas marking menu so that you select whole hulls at a time rather than CVs.
Once you have the general shape and you are starting to have to duplicate detail on the two sides of the primitive, it is time to detach one half and instance and mirror the remaining side so that the software duplicates your modeling across both sides automatically.
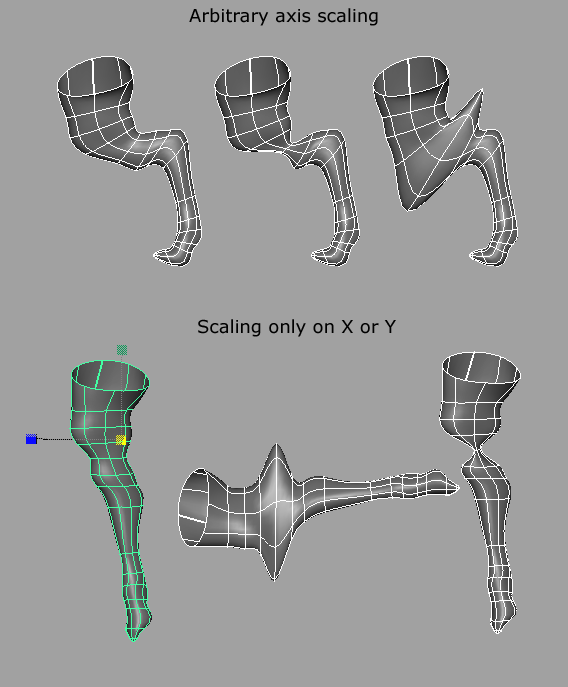
Keep hulls in a parallel line. Usually this means insuring isoparms are as vertical
and horizontal as possible but sometimes hulls are moved so that they lie on a diagonal
to follow the reference correctly ie a diagonally sloping tail. Keeping the hulls
in a line makes it easier to edit once detail has been added. When scaling along
non horizontally or vertically aligned hull CVs in Maya use the shift-middle mouse
button to scale along an arbitrary axis. This feature was incorrectly documented
as the Ctrl key in the Maya 4.0 and previous documentation. This allows easy creation
of the form bent to the correct rather than shaping it while it is extended in the
X or Y and then moving and rotating the hulls into place.

When you have the general shape it is time to edit groups of CVs in th hull row. Remember that CVs need to be close together to create a detailed surface that changes direction in a small surface area.
Get to know the keys or mouse bottons that will add, remove and inverse either your individualy selected CVs with single mouse clicks or groups of CVs with the marquee selection tool. Use camera rotation for strategic positioning of target CVs selection without selecting those on the back of the model. For example rotate until side on to a group of CVs before using a marquee selection region.
When editing CVs in a perspective view use the manipulator in one axis then another - ie X then Y - never in all axes at once - in Maya by grabbing the centre of the move manipulator - as there is no way for the application to know where in 3d space it should move the point unless you move it correctly along each axis independently. More than one position of a CV can appear the same when moved along more than one axis - think of your incorrect perception of positioning in forced perspective used to show real characters as miniatures in movies by placing one nearer the camera.
In areas where more detail is required you can either bunch CVs by moving them closer together or insert an isoparm. Rember that inserting an isoparm will add a row of CVs along the whole direction of the inserted isoparm.
If there is great variation required in the detailing of different areas - low detail on chest, high detail around eyes and mouth - you can consider dividing up your model into patches of varying detail. With this approach called 'patch modeling' you slice the model into multiple surfaces that have varying numbers of isoparms where more or less detail is required.
You will need to check the positioning of any element from more than one camera angle by rotating the camera. This is for the again for the reason that more than one position of an element can appear the same.
Frame a selected area of interest in the viewport - the F key in Maya - and change the camera view from left to right and up and down to check that the positioning looks accurate from all directions. Framing sets the aim point of the camera and causes the camera to tumble around the framed object. It will also be required if you have multiple objects a large distance apart.

